Monday, March 27, 2017

Watercooler Wednesday Challenge-WWC111 - Marsha's Masculine "Anything Goes" Challenge! Take 2

UPDATE! YAY!!!!!!!!!!!!!

Do you ever do something and just feel that it just isn't quite finished? Well that is me today. I made a masculine card and I love it but it just doesn't feel finished to me. So I have added watercolor and finished it. What do you think? Which do you like better? Please feel free to leave me a comment! aAnd let me know your thoughts!

The After Picture

The Before Picture
And here is the link for this challenge if you would like to play along! http://watercoolerchallenges.blogspot.com/2017/03/wwc111-marshas-anything-goes-masculine.html


Hugs!
Judy

Watercooler Wednesday Challenge-WWC111 - Marsha's Masculine "Anything Goes" Challenge!

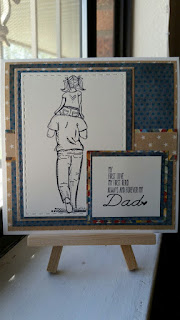
Hi All! And Happy Monday! Here is my submission for the WWC111 - Marsha's Masculine "Anything Goes" Challenge!

I hope you all like it! I love the simple elegance of this set. And finding masculine images can sometimes be tricky. But what is wonderful is as is, using watercolors or using copics, this image is super versatile!

 
I Love it but it just doesn't feel quite finished to me so I have added watercolor to the image. Which do you like better?
 
 
I have used a stamp set from Unity Stamps called First Love First Hero and I have paired this set with papers from the Madison line from Anna Griffin and the Mac line from Bazzill Basics Paper.
 
 
Thanks for stopping by!
 
Hugs,
Judy

Tuesday, March 21, 2017

Any Harry Potter Fans Out There? Craft Fantastic is Perfect for Custom Projects!


Hi All! Do you have any Harry Potter fans in your life? I certainly do! My baby is a huge Harry Potter fan and her birthday is coming up! Customizing with  Craft Fantastic for that perfect gift to the rescue! Today we will make three projects that are being customized for my harry Potter fan, but you can customize these whether you us personal photos or other images that have special meaning for that special person.

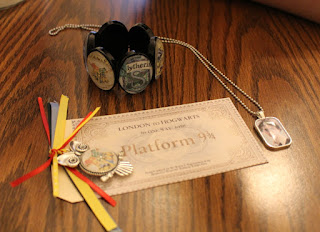
First up is our Black Retro Posh Bracelet. This bracelet comes with six large glass ovals. These are perfect for pretty good size images and would also be great for images of family, friends, and even fur babies.

I chose for this the Hogwarts Crest and the various Hogwarts House Crests. I found images on the internet and brought them into Microsoft Word. I made sure I sized them to fit the glass and printed them out on my printer. I then took the color printouts and made color copies. I used the color copies for my actual project. The rest is simple, apply Fantastic Glaze and Glue to the flat side of the glass and place over the image. Wiggle to make sure the glue is spread over the entire image and make sure you have the glass over the image as you want it to appear. Hold in place until it stops wiggling. Use a Q-tip around the edges to wipe off any excess glue. Then take a scissor and trim around the edges holding the scissor at a forty five degree angle.This will allow you to get a closer cut to the glass.

 I did use four Fantastic Jewelers Dots per glass piece. This is probably a little excessive, but my recipient is going to be eleven and she can give a bracelet a workout. Check out the finished project!

Next up is an adorable Harry Potter necklace. Again I followed the same procedure for grabbing an image as above. I used the Small Rectangle Pendant Kit in Silver. Both the tray and the glass come in this kit. Follow the same procedure as above using Fantastic Glaze and Glue and adhering to the tray using Fantastic Jewelers Dots. For this I only used two dots.

I then finished this project off with a 24 inch Silver Ball Chain.  How cute is this!

And finally, a ticket on the Hogwarts Express! I used a craft tag and used Fantastic Glaze and Glue to adhere a Hogwarts ticket image to the tag. Next I took one of the adorable Owl Tray in Silver and using the Hogwarts crest adhered the image to a Medium Glass Round and attached the glass to the owl tray with  Fantastic Jewelers Dots. I then attached the owl tray to the tag using ribbons in Hogwarts colors. This will be perfect either for a card or as a bookmark for my daughter!

What do you think?

As always, i do hope you have enjoyed these fun projects and please post in the comments below if you have any questions at all!

Hugs,

Judy

Tuesday, March 7, 2017

A Touch Of The Southwest Pendant

Hi All and Happy Tuesday! Today I am bringing you a really fun Touch Of The Southwest Pendant. I warn you, this is one technique that is so much fun that you may want to get some extra glass. Once you start it is hard to stop!

Ok, lets get started! For this project you will need three strands from the Faux Leather Necklaces Assortment, Small Silver Jump Rings, Multi Purpose Jewelry Pliers, Fantastic Jewelers Dots, One Opera Tray and Medium Glass Oval from the March Kit Of The Month, and nail polish!

Please note, the picture shows large jump rings butI realized in order to be able to take the leather cord on and off the pendant you need the small jump rings to fit through the loop attached to the Opera Pendant, and also I inadvertantly left off the wire cutter.

First, on the flat side of the jewelers glass you must remember that you are going to apply the nail polish from the top layer first. I have used two different shades of glitter polish for this first layer.

Then I applied two different shades of turquoise nail polish.

Your first layers should be transparent, and as you add layers, the layers should become more of an opaque coverage. Set this aside to dry.

While this is drying you are going to take three leather strands and snip off the clasp pieces from both ends. Using a small jump ring on each side attach the three leather strands so that they form one piece. Using the pieces that you clipped off, add the clasp onto one jump ring and the chain piece on the other jump ring.

Once your pendant is dry, adhere to the opera pendant using the Fantastic Jewelers dots and thread your leather necklace through! And there you have A Touch Of The Southwest!

Try this technique using various shades of polish along with various specialty coats! Can't wait to see what you all come up with! And make sure to check out our Shows and Workshops page on the Craft Fantastic webpage and come out to see the amazing Craft Fantastic Team when we are in your area!

Hugs,

Judy

Friday, March 3, 2017

Kraftin Kimmie Saturday Challenge

Good Evening All! Here is my entry for the Magical Challenge! Hope you like it!

Thursday, March 2, 2017

Sharing some Prima Projects

Good Morning All and Happy Thursday! As many of you know, while I have been crafting for many years, I have only recently started working on my blog and so today I would like to share some of the projects I have done featuring Prima products. I have been a huge Prima fan for many years and just love playing with all their different product lines. I will be featuring some tutorials for Prima products in the upcoming weeks but for now, a taste!
This is one of the Prima bird cages and features many gorgeous Prima flowers along with Finnebair stencils, Art Alchemy Acrylic Paint Opal Magic and of course a string of Prima Lumies. 
And here you can see a bit more of the detail.
Next, here is another fun project using some more of Finns fabulous products

 And another featuring Frank Garcias Memory Hardware.

And one more for now which features some pieces from the Relics and Artifacts line as well as some of Finnebairs Art Ingredients, Prima Paper Collection, Dresden Trim and much more Prima goodness!

I do hope that you have enjoyed this peek into some Prima fabulousness and will be sharing more soon!
 
Hugs,
Judy