Friday, July 31, 2020

Ok Who Is Looking For A Sale This Weekend!

Happy Weekend Everyone!!!! So glad we are at the weekend!!! So to start off Scrapsalot is having a fabulous sale this weekend!!!!
But before I tell you about that let me show you a super sparkly project with lots of great things you can find in the shop. To begin, I used Catherine Pooler Inks in Sauna, Orange Twist, and Party Dress with a Honeybee Stencil called Geometric Background, and applied my inks with a blending brush. I let this dry. Next I used this adorable stamp set from Sugar Pea Stamps called Jukebox Jive which is a great set with lots of fun images. I stamped my image in Memento Tuxedo Black Ink. I then colored up this fun image with Copics in RV06, YR07, Y15, YG23, B04, and V15. Next I stamped my sentiment, also from the same set with StazOn Jet Black and then used Clear Embossing Powder over the top and hit it with my heat gun, so that the sentiment would stand out more from the jukebox. I then fussy cut my image. I also cut a black card base to 4 1/4 by 5 1/2. And now I came back for the pow part of my background layer. I used the new Stickles Glitter Gel in Nebula over the top and let it dry. I then assembled everything using foam tape.So, what do you think?


Now about that sale, as per Debra, Buy 4 items, get 5th one FREE!!! (Item of equal or lesser value will be free item) **Due to system limitations, only one B4G1 deal per order. Message Debra and we can work your order if you have more than one order!!!
Scrapsalot carries most of these amazing products in the store! You can also check with Debra for availability on specific products,  and while you are there, here is a code for a 10% discount on your order! Just enter JUDY10 at checkout for your discount! Remember, if you don't see it in the shop, email Debra and she can help you with whatever you are looking for!
Stay Well Everyone! More fun projects are coming right up so stay tuned
Hugs,
Judy

One Last One For Christmas In July

Hi Everyone! Ok I had to do one last one for Christmas in July! It seems appropriate that for this last one I amso used up the last of my Merry Mint Sparkle Blend. So without further ado, a smple Christmas shaker card. This is a pretty simple one that you could easily reproduce for making a batch of cards. I am using my Queen and Company Circle Shaker kit and one of the 6x6 Paper Pads from Doodlebug.  Enjoy!


So get ready for the new August Release coming out, and to grab the Sparkle Blends July Release before it is gone, as well as all of the amazing Sparkle Blends, head over to the Sparkle Blends Shop. And, take a look on the Doodles Paper Playground blog, Facebook page and in the Sparkle Blends Fan Club on Facebook to see all the fun things going on!
I do hope you enjoy this project and can't wait to see what you create!

Hugs!
Judy

Who Doesn't Love A Butterfly

Hi Everyone! Today I am sharing with you a fun and easy project that you can really use for lots of different occasions. You may have seen shaped cards done by people and wondered how they do it. Well, lets dive in and let me give you a few pointers. First, I am using a butterfly shaped card. This is a die set that is designed to be used either as a large layered die cut set or as a shaped card. For my card base I am using the largest die. I am folding my Pop Tone Black Licorice Card Stock in half and positioning the fold inside the top of the die. This way the top of the card will stay attached, giving me my card base.


Next, using the second largest die I am going to cut out a shadow layer from Pop Tone Razzleberry Cardstock and using both the same die and the interior die I am going to cut the "fancy" layer using Stardream Metallic Silver Cardstock. Now here is another trick. I personally like to make using intricate dies easier for myself by adding on my adhesive before I die cut. So, take some Scor Tape and place it on the back of what you are going to die cut. So you are adhering one side and leaving the paper on the other then running it through your die cutting machine. It makes it into a diecut sticker in one pass. And now all you have to do is assemble your layers.


I also used the smaller dies using Stardream Metallic Gold Cardstock and following the same technique for the body and antennae and added a touch of lavender bling. So here is the final result. What do you think?


Thanks for stopping by today and I hope you have enjoyed this project!
Hugs,
Judy

Wednesday, July 29, 2020

Merry Christmas

And now for a little more Christmas in July! I am bringing you a Sparkly Christmas Tree! Check this out!
This project features the fabulous Oh Christmas Tree and Old St. Nick Sparkle Blends. These two work together so well and allowed me to use the fabulous elements from both blends to give me tiny Santas, Tiny Christmas Trees, stars for both the sky and to decorate the tree. There are so many fun elements in these blends!
I created my background using Catherine Pooler Inks in Juniper Mist, Suede Shoes and It's A Boy, and have applied these with Taylored Expressions Blending Brushes. I then used Lawn Fawn Stitched Hillsides to create my snowy layers and attached these with Scor-Tape. Then I stamped and colored up the tree from a stamp set from Stamps of Life called Christmastree2stamp and cut it out with the coordinating die set. I colored it up with Copics in G03, G05 and G09. The sentiment is also from the same set and I stamped it using the same Catherine Pooler Juniper Mist ink. I then adhered the Sparkle Blends to my project using a combination of glue dots and On Point Glue.


To see more of the Sparkle Blends July Release as well as all of the amazing Sparkle Blends, head over to the Sparkle Blends Shop. And, take a look on the Doodles Paper Playground blog, Facebook page and in the Sparkle Blends Fan Club on Facebook to see all the fun things going on!
I do hope you enjoy this project and can't wait to see what you create!

Hugs!
Judy

Tuesday, July 28, 2020

You guac my world!

Hi Hedgehog Hollow fans! Today I am bringing you a combination of two of the sets from the July Club box. I am also using the fabulous stencil that was also in your July kit. I have also just started my very own YouTube channel so you can see a video tutorial of this project here!
To begin I am using three shades of Catherine Pooler Inks in Party Dress, Orange Twist and Sauna and applying them with Taylored Expressions Blending Brushes.

Next I am applying the new Ranger Stickles Gel in Moon Dust on top of where I just applied the inks.
I then removed the stencil and cleaned it immediately.
Next I stamped two of the pugs from the pug set, as well as the avocado and the taco from the food set. I did use my MISTI with Memento Tuxedo Black Ink. I did realize I had forgotten to stamp the two dog bowls and stamped them later.

And now for the Copic part. For the taco I used Copics in Y15, YR09, E15, E18, Y21 and G07.

For the avocado I used Copics in YG17, YG21, YG 23, and YG25.
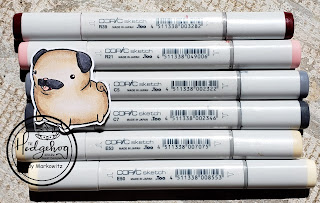
For one of the pugs I used Copics in E50, E53, C5, C7, R21 and R39.

And for the other pug I used Copics in E40, E41, E42, E43, C5, C7, R21 and R39.
For the dog bowls I used Copics in Y15 and YR09.

I then stamped from the food set my sentiment using Ink on 3 Juicy Clear Embossing and Watermark Ink and Nuvo Fine Detail Glacier White Embossing Powder. I then used my heat gun to activate the embossing powder.
After I finished up coloring and fussy cutting, my background was now dry so it is time to assemble the project. I used foam tape to pop up my mugs, my sentiment, dog bowls and foods. As my final step I attached my card panel onto my card base using Scor-Tape. And here is our final project!


I do hope that you have enjoyed this project and video and have loved Guest Designing this month!Hugs Everyone!
Judy

Monday, July 27, 2020

Hope & Joy

So today I am bringing you some Elvely goodness! Check out these two cuties!
This project features the fabulous Merry Mint Sparkle Blend. I have used it not only in the shaker but also to top off their fun hats!
I have created the shaker using circle dies as well as a die that says Hope & Joy. These adorable elves are from a stamp set from Stamps of Life called elves2stamp and I have used the matching dies as well to cut out these cuties. The present is also from the same set.  I have colored up the images using Copics in G03, G05, G09, E11, E21, E00, R27, R29, R39 and YR31. These fun papers are also from Stamps of Life in a 6x6 paper collection called Hope & Joy Collection.


To see more of the Sparkle Blends July Release as well as all of the amazing Sparkle Blends, head over to the Sparkle Blends Shop. And, take a look on the Doodles Paper Playground blog, Facebook page and in the Sparkle Blends Fan Club on Facebook to see all the fun things going on!
I do hope you enjoy this project and can't wait to see what you create!

Hugs!
Judy

Saturday, July 25, 2020

My First Ever Youtube! And Team Tiny Christmas In July Youtube Hop!

Hi Everyone! Check it out!!!! Here is my very first YouTube video on my brand new channel!You can find it here: Team Tiny Christmas In July Blog Hop and here is a Playlist for the Hop with all the stops!
Here is the super fun Infinity Shaker project I created featuring a Joy Clair image called Snowy Greetings and Joy Clair has generously given us a special discount code for the hop. The code is TEAMTINY20 20% off from the 25th until 28th for stamps only, except last call section of the store. The code cannot be used for Last Call, Dies, and Stencils.
I have also used a now retired Sparkle Blends Shaker Mix called Frozen.Even though this one is no longer available, check out all the amazing blends that are, and there is a fabulous new release that will be coming out in August! I show you step by step how to create this card, including how to create an infinity shaker.

So head on onver and check it out and check out all the great videos in our YouTube Hop. You can find them all under #TeamTiny ChristmasInJuly
So please consider subscribing. I still have a ton to learn and will keep improving, and I have a lot of great content coming up!
As always, I can't wait to see what you create!
Hugs,

Judy

Thursday, July 23, 2020

Ho. Ho. Ho

Hi Sparkle Blends Fans! Today I am bringing you some more Christmas in July cheer featuring the big guy in all his sparkly jollyness! And I am using the perfect blend! His very own specialty blend, Old St. Nick! Have a look!
For this project I used a stamp and die set that is one of my favorites from The Stamps of Life and it is called Santa2Stamp and Santa Dies. I used the matching die set to create the shaker opening rather than using it to paper piece his hat. I added a layer of acetate behind and foam tape to create my shaker pocket.
To make my santa super textured, I colored him up with Copics, but then added texture to his mustache and beard with a Snow Marker from Marvy Uchida.
This is the first time I have used this. You add the marker where you want the texture and then hit it with your heat gun and it poofs up! So totally fun! Then I added Stickles Glitter Gel in Moon Dust to the brim and the poof of his hat. I am totally loving how this all came together.
To see more of the Sparkle Blends July Release as well as all of the amazing Sparkle Blends, head over to the Sparkle Blends Shop. And, take a look on the Doodles Paper Playground blog, Facebook page and in the Sparkle Blends Fan Club on Facebook to see all the fun things going on!
I do hope you enjoy this project and can't wait to see what you create!

Hugs!
Judy

Sunday, July 19, 2020

Still Christmas In July

Hey Sparkle Blends Fans! Today i am sharing another fun and sparkly Christmas In July project with you!
Check this out. This project uses an older coverplate die from Queen and Company that cuts out a basic Christmas Tree. I put some seriously sparkly silver glitter paper behind it, and some green glitter on top. And then in all my shaker spots I used Sparkle Blends Merry Mint. I also added the star on top of the tree with a gold star from the Oh Christmas Tree Sparkle Blend. I then finished up with stamping a sentiment from an older Stamps Of Life Stamp Set called Santa2Stamp with Memento Tuxedo Black Ink onto some plain white cardstock and trimmed it down to fit at the bottom of my card.

To see more of the Sparkle Blends July Release as well as all of the amazing Sparkle Blends, head over to the Sparkle Blends Shop. And, take a look on the Doodles Paper Playground blog, Facebook page and in the Sparkle Blends Fan Club on Facebook to see all the fun things going on!
I do hope you enjoy this project and can't wait to see what you create!

Hugs!
Judy

Pug-tastic!

Hi Everyone! I am so excited and honored to be Guest Designing this month at Hedgehog Hollow! Today I am bringing you an Infinity Shaker Card using the July Hedgehog Hollow Subscription Box. To begin, I have used all of the adorable pug images in this months kit. I stamped them all out using my MISTI and Memento Tuxedo Black Ink. I then have colored in all the images using Copics in the following colors: E13, E15, E18, E40, E41, E42, E43, YR1, Y23, R21, YG03, YR68, W3, W6, W9, and W10. After coloring up the images, fussy cut them so that they are ready for the next step.
Next I have cut a piece of the cardstock to 5 1/2 inches by 5 1/2 inches. I then used the fabulous stencil included in this months kit with Catherine Pooler Inks in the following colors: Pixie Dust, Fiesta Blue, Aquatini, Garden Party, Limoncello, Bellini and Be Mine. I applied these colors using blending brushes. I love the coverage that the blending brushes give me and the vibrancy of the colors from these inks on the included cardstock.
We are then going to stamp our sentiment, Pug-tastic from the same stamp set, using Memento Tuxedo Black.
Next attach the pugs to the background.
Next I have cut a piece of acetate to 8 inches square. I then scored the acetate at 1 inch on the bottom, 1 inch on the left side, and 1/14 inches from the top and from the right side. Because we are not using any foam tape on this shaker, we need to leave a little extra room on the dimensions of the acetate to account for the dimension of the shaker bits. We then will clip the corners of the acetate so that the acetate will fold cleanly to create the shaker pouch. Next, use double sided tape along the back of the panel on all four sides. You want to create a seal all the way around to make sure your bits don't leak. Place the card face down on the acetate and peel off the backing of the double sided tape.
Attach three sides of the acetate, leaving the last side open. I am using Sparkle Blends Pawsome Pets Sparkle Mix. This is such a great shaker blend. Add in the shaker bits and then seal the last side. 
Now as this is a 5 1/2 inch card, we are going to take another piece of cardstock and score it at 5 1/2 inches and add adhesive to the small flap. Then cut a second piece of cardstock to 5 1/2 inches. Adhere the two pieces together to create the card base.
 The hinge piece will go behind the front shaker so it will not be visible. Finally, attach the shaker to the card front and there you have it.


I do hope that you have enjoyed this project and would love to see you give it a try!
I can't wait to see what you create!
Hugs,
Judy