Wednesday, September 29, 2021

Believe

So, one of the things that I adore about the holiday season is the magic! I love all the magicalness of the lights, the smells, the total sparkle of the holiday season. I am "that parent" that would go to Polar Express even if my children are at that point that they don't want to. I really love everything about the magic of the season. And with that, I bring you this. 

For this project I am using a bit of a combination of things. The magic comes from the sparkle of a Sparkle Blends Mix called Stockings Were Hung. I am using my shape elements, sentiment and foam shaker from Heartfelt Holiday Shaker Kit by Queen and Company along with papers from North Pole Party and Winter Wonderland Solids 6x6 paper pads, also by Queen and Company. I am also using a bow from Anna Griffin as well as cardstock card base from CutCardstock. I am also using Scor Tape and Lawn Fawn Glue Tube to attach everything.


I really adore how this came out!

Head over to the Sparkle Blends Shop. and grab your favorites!!!!!! And as always, take a look on the Facebook page and in the Sparkle Blends Fan Club on Facebook to see all the fun things going on!

I do hope you enjoy this project and can't wait to see what you create!

Hugs!
Judy

Saturday, September 25, 2021

Team Tiny Video Hop

 Hi Everyone, and Happy Saturday! Yes, you read that right. I did say Video Hop! Yup, I made a video and am participating in a video hop! There is definitely what I consider to be a definite learning curve on making videos which is very different than doing a blog post or an Instagram post. And for me personally, I have a really short attention span. 

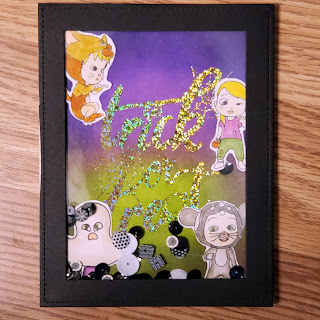
So here are the basics. Check out this company, https://www.crescentcreation.com/ . I got to play with two of their new digi release sets, Big Trick n Treat Sentiment Digital Stamp and Trick or Treat Digital Stamp and with these I am doing some ink blending, foiling and, you know me, a shaker card ultimately!.

Oh, and did I mention, Crescent Creation will be giving away a $25 gift certificate to their store! So you have to comment on the different Youtube videos in the hop. You can find the hop with hashtag #teamtinycrescentcreationhop

So here is the link to my video! https://youtu.be/EiC3IO2ESks 


Please, have a look and I really want to know what you think. And since I am new at this, constructive criticism is welcome. Also, if there is something in particular you would like me to cover, definitely let me know!

As always!

Hugs,

Judy 


Friday, September 24, 2021

Fall Birthdays? Yes Please!

I love making Fall cards, and I love making Birthday cards. And when you can combine the two? Well, what could be better! So let's get started!

I wanted a slightly warmer tone with this Fall Birthday card, so I am using  Classic Crest Baronial Ivory 80# Cover for both my card base and for my leaf blending layer. So I am cutting an A2 card base (8 1/2 inches x 5 1/2 inches and then scoring at 4 1/4 inches. I am then taking the other half of my sheet of cardstock and using Catherine Pooler inks in Tutti Frutti, Orange Twist, Shea Butter and Tiki Torch and blending these with my Taylored Expressions Blending Brushes. Now since I am intending on die cutting this with a leafy border background die, I wasn't looking for a perfect blend. So you can see I have done this blending first before die cutting. 

Next, I am using the new cover die from Lawn Fawn called Fall Leaves Backdrop, and cutting out my leafy layer.  Now I did want a bit of a border on the card so I cut the die a second time, but this time I used Stardream Metallic Gold 105# Cardstock.I then trimmed off the leaves, which then gave me a perfectly fitting border. I then used ScorTape to adhere my leaf layer and my gold frame layer. 


Next for my sentiment I used a pretty new to me die set from Spellbinders called Simply Perfect Mix and Match Sentiments. Now what I really adore about this die set is that if you look, you will see that the dot for the letter I in Birthday is actually an attached piece and not a separate floating little dot, that I tend to lose when making cards. So I have taken a piece of Ginger Snap Cardstock and before running it through my die cutting machine, I am adding some ScorTape behind so that when I cut the sentiment out, I am actually making myself a sticker. This makes the whole adding of a die cut so much easier. At least it makes it easier for me.

And with that, our project is complete!


I have an affiliate link for CutCaardstock if you would please consider using it. It doesn't cost you anything to use and does help me continue to bring you fun and fabulous projects! Here is the link: 

https://www.cutcardstock.com?p=HJ0CrVwH8

I do hope you have enjoyed this project, and as always I can't wait to see what you create!

Hugs,

Judy


Saturday, September 18, 2021

Christmas Wishes....Gettin Crackin On Christmas

So I am usually a last minute person, although I really always rather be one of those that are not stressed and finished with things way ahead of time. Well this year I am promising myself that I will be more on top of Holiday cards. So today I am bringing you a holiday card! I have been playing with the fantastic new release from Sparkle Blends and can't wait to show you some total cuteness!

I am using the Sparkle Blend called Gingerbread House, and what better to use it with than North Pole from Queen and Company! The stamps, dies and shaped shakers work with this blend perfectly! Have a look!


I really adore how this came out!

Head over to the Sparkle Blends Shop. and grab your favorites!!!!!! And as always, take a look on the Facebook page and in the Sparkle Blends Fan Club on Facebook to see all the fun things going on!

I do hope you enjoy this project and can't wait to see what you create!

Hugs!
Judy

It Is Time For A Fall-Oween Blog Hop With Cutcardstock!

Welcome to our Cutcardstock Fall-Oween Blog Hop! And what makes blog hops more fun? Prizes!!!! So here is the scoop: there is a $40 gift card to Cutcardstock up for grabs. In order to win you need to comment at each stop along the hop OR upload a project that includes product from Cutcardstock. The winner will be randomly selected via number generator and announced on Monday, Sept 20th on the CutCardstock Blog and Facebook page. 

Here is the list of stops along the hop:

- (Next stop, submit a project for another chance at the prize!)

Now for my project for you I am sharing an easy and fun project. For Halloween, my daughter wants to be handing out candy to her friends at school. She is in High School so they don't necessarily do Halloween parties. So lets get started. 

I am starting with Pop Tone Black Licorice Cardstock, and I am cutting sheets to create pieces that are 11 inches x 3 1/4 inches. Next I am scoring these at 5 1/2 inches. I am also scoring at 1 inch from one of the ends, which will create a fold. I am making a few at a time so I am repeating this step for each one I want to make.

Next I am using 6 x 6 papers from Pumpkin Party from Doodlebug. I am cutting these papers to 4 1/2 inches x 3 inches. When you are doing this, depending on the pattern on the paper, you may need to make sure that you are cutting in the right direction so that the picture makes sense.

I am then using my favorite scor tape to attach my sides as well as my patterned paper.

From here, it is really down to how you want to decorate. I am using one of the cut apart sheets in the same paper pad. Now these cutaparts are 1 1/2 inches x 2 inches. I am then cutting Canvas Rubber Ducky Yellow Cardstock at 2 1/4 inches x 1 3/4 inches to mat my little cutapart pieces. I am adding some washi tape to the flap and adhering the flap so it stays open. I am also using Foam Adhesive Squares to pop them up. And there you have it. A really fun way to make passing out treats a little more fun for those special people on your Trick Or Treat List!

I have an affiliate link for CutCaardstock if you would please consider using it. It doesn't cost you anything to use and does help me continue to bring you fun and fabulous projects! Here is the link: 

https://www.cutcardstock.com?p=HJ0CrVwH8

Make sure that you do visit the CutCardstock here to enter your project! I do hope you like this fun way of decorating you Trick Or Treats and as always, I can't wait to see what you create!

Hugs,

Judy


Thursday, September 9, 2021

Ah Sunflowers!

Is there any flower that says Fall more than sunflowers? I have always loved sunflowers, and seeing them just always makes me smile. So when I saw this amazing layering stamp se from Hero Arts, called Sunflower Field Color Layering Scape. I knew I just had to play with it. I wanted to do something a little different though from what i have been doing lately using white cardstock for my card base, so I have changed it up a bit. I am using Stardream Metallic Gold 105# Cardstock, which I have cut to 5 1/2 x 8 1/2 inches and scored at 4 1/4 inches to create my A2 card base. I then cut cardstock layers as follows to create my layers: Pop Tone Orange Fizz Cardstock cut to 4 1/8 x 5 3/8 inches, Ginger Snap Cardstock cut to 4 x 5 1/4 inches, Pop Tone Hot Fudge Cardstock cut to 3 7/8 x 5 1/8 inches, and Classic Crest Cardstock in Classic Natural White cutting 2 pieces, one cut to 4 1/8 x 5 3/8 inches and the second cut to 4 1/4 x 5 1/2 inches to use for stamping.

I am using ScorTape to adhere all my cardstock layers to my front panel as well as the Natural White Cardstock to the inside of the card to give a perfect spot for writing a special message.

Now for stamping my layering scene I am using that piece of Natural White Cardstock cut to 4 1/4 x 5 1/2 inches. It will get trimmed down after we have stamped so it is ok if it is a little off. Now for my stamping I am using my MISTI. I would absolutely recommend to anyone using layering stamps that you use some kind of stamp positioner as it makes the process so much easier. I am using Catherine Pooler inks in the following colors to create my layers: Grass Skirt, Spruce, Sauna, Orange Peel, and Icing On The Cake. These created my layered sunflower field.

Next for some ink blending to create my sky. I used Taylored Expressions ink blending brushes. Again I am using Catherine Pooler inks, but for this I am using Shea Butter, Bellini and Sauna.
 
I am then using a die from Pinkfresh Studios Essentials Die Set called Stitched Rectangles to then cut the stamped image down. I then decided to use a sentiment from a different Hero Arts set called Tulip Field Color Layering Scape, and I stamped this with Memento ink in Rich Cocoa, using my MISTI to position and stamp the sentiment. I then attached this to the card and there you have it!


I have an affiliate link for CutCaardstock if you would please consider using it. It doesn't cost you anything to use and does help me continue to bring you fun and fabulous projects! Here is the link: 

https://www.cutcardstock.com?p=HJ0CrVwH8

I do hope you have enjoyed this project, and as always I can't wait to see what you create!

Hugs,

Judy


Wednesday, September 8, 2021

It Is Time For Challenge #223 With The Crafty Gals Corner!!!!!

Hi All and Welcome to Challenge #223 with the Crafty Gals Corner! This time the challenge is Hello Fall! For this challenge you need to create a project that is somehow Fall related! Personally I am finding it hard to believe that it is almost Fall but maybe it is just me. Check out the gorgeous samples from the design team! You can find them all here on the Crafty Gals Corner Blog Our Sponsors for this challenge are:

Dr. Digi's
Prize ~ 2 Digital Images
Prize ~ 3 Digital Images 
 
Prize ~ 3 Digital Images

For this challenge I got to play with Patient Pets from Dr. Digi's. I totally adore Dr. Digi's and when I saw this image I totally fell in love!

This image has been colored up with Copics. I used some papers from my stash for my card base and layers. This is an A2 card and I really adore how this came out. I will definitely be using this image again!

So we would love for you to play along! Remember this challenge is Hello Fall, so post your image on the Crafty Gals Corner Blog for a chance to win the prizes for this challenge! You can get to the Crafty Gals Challenge blog by clicking here. You have until 11:00 am MST on October 11th to enter! I can't wait to see what you create!

Hugs!

Judy